Posts

Showing posts from August, 2021

Send an email using Power Automate Flow.

Image
Hello Guys, In our previous  blog  we have seen how to send an email using the same template using MS Flow. Today we will see how to send email using Power Automate Flow but without Email Templates. But before d o follow us to know more about Dynamics and Power Platform. Also if you like our blog then please comment and share this blog with your friends. We have already selected our environment and created a solution named "Blogger".  Click on New and select Cloud Flow. We will trigger this flow when a new employee record will be created. Specify the Name of the flow and search "When row is added" and select the step. Configure the first step as shown below: Add a new step and initialize one variable as shown below: Add a new step and search "Get row by id" and configure the step as shown below: Now add a new step and search Compose. Configure the step as shown below: Here in above step we have used formula for Marital Status and Gender: if(equals(triggerO...

Send an email using the Email Template and Power Automate Flow.

Image
Hello Guys, In our previous  blog  we have seen how to create Email Templates for Custom Entities. Today we will send an email using the same template using MS Flow. But before d o follow us to know more about Dynamics and Power Platform. Also if you like our blog then please comment and share this blog with your friends. We have already selected our environment and create a solution named "Blogger".  Click on New and select Cloud Flow. We will trigger this flow when a new employee record will be created. Specify the Name of the flow and search "When row is added" and select the step. Configure the first step as shown below: Click on New Step and search "List rows" and select the step. Configure the step as shown below: Click on New Step and search "Perform an unbound action" and select the step. Here we need to provide below detail for configuring the step. Action Name: Select SendTemplate from the list of actions. Template Id: GUID of the Em...

Creating Email Template for sending Emails for Custom Entities in D365.

Image
Hello Guys, In our previous  blog  we have seen how to create Email Templates. Today we are going to see how we can create Email Templates for Custom Entities. But before d o follow us to know more about Dynamics and Power Platform. Also if you like our blog then please comment and share this blog with your friends. Consider a scenario where we have one custom entity named "Employee" and we want to send an email to the employee for confirmation of their detail information provided by employee whenever a new employee record is created. To achieve this we need to create an email template first. First of all visit  https://make.powerapps.com  and select your environment and current working solution. Now click on New and select Email Template. This will open a new window.  While creating Email Templates we are selecting entities as shown in below: As you can see our employee entity is not visible. In this scenario we need to select "Global" option for working w...

Creating Email Template for sending Emails in D365.

Image
Hello Guys, In our previous blog we have seen how to call custom API and custom Function using Power Automate Flow. Today we are going to explore about Emails. But before d o follow us to know more about Dynamics and Power Platform. Also if you like our blog then please comment and share this blog with your friends. While working with D365 we come across many scenarios where we need to send E-mails like, Greeting mail, Confirmation mail, Follow-up mails etc. D365 CRM allows us to create Emails using Email templates. So let's see how to create Email Templates. First of all visit  https://make.powerapps.com  and select your environment and current working solution. Now click on New and select Email Template. This will open a new window. Select the Entity for which you want to create template. In our case we are going to select Lead and click on OK. Now specify the information as shown below: Click on Save and scroll down the window so that we can specify the content in the body...

Calling Custom API and Custom Function using Power Automate Flow.

Image
Hello Guys, In our previous  blog  we have seen how to use OOB Web API using Power Automate Flow. Today we will see how to use Custom API and Custom Function using Power Automate Flow. But before d o follow us to know more about Dynamics and Power Platform. Also if you like our blog then please comment and share this blog with your friends. Till the time we have seen how to create Custom API, Custom Function an How to connect OOB API using Power Automate Flow. You can learn these all concept using below links: https://ravishchandragupta.blogspot.com/2021/08/creating-custom-api-in-d365.html https://ravishchandragupta.blogspot.com/2021/08/custom-function-using-custom-api-in-d365.html https://ravishchandragupta.blogspot.com/2021/08/connecting-d365-crm-using-web-api-and.html Calling Custom API using Power Automate Flow is similar to calling Bound and Unbound Action using Power Automate flow . So now we will be calling Custom Function using Power Automate Flow. We will be work...

Connecting D365 CRM using Web API and Power Automate Flow.

Image
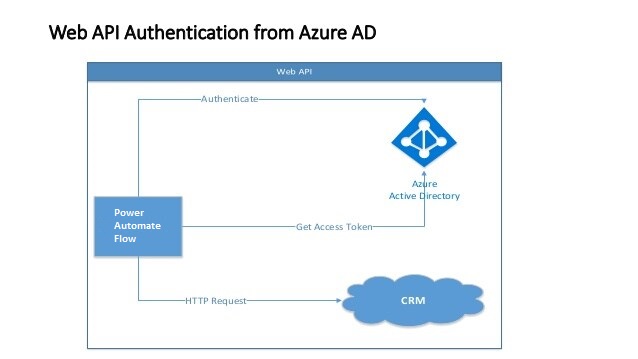
Hello Guys, In our previous  blog  we have seen how to create Custom Function using Custom API. In this blog we will see how to use OOB Web API using Power Automate Flow and in our upcoming blow will we see how to use Custom Function using Power Automate Flow. But before d o follow us to know more about Dynamics and Power Platform. Also if you like our blog then please comment and share this blog with your friends. Connecting D365 CRM using Web API and Power Automate Flow is similar to connecting D365 using Web API and C# which we have already explained our one of the blog . To do so first of all we need to acquire token from the Azure Active Directory and then that token will be used for authentication. So let's see how to do that. First of all we will be creating client secret which will be used for authenticating d365 user. Visit  https://portal.azure.com . Click on Azure Active Directory and select App registration. Click on your application which you have registered ...